How to define rotation in CENOS
Induction hardening of gears, pins, CV joints and other rotational parts very often utilises the so-called "single shot" heating approach, where the part is being rotated during the heating to acquire a uniform heat pattern.
Depending on the shape of the part different inductor designs can be used, and the same goes with simulation - depending on the part different simulation approaches can be used to account for the rotation of the part.
In this article we will learn how rotation can be defined in CENOS and which approach to choose depending on your geometry.
Rotation definitions in CENOS
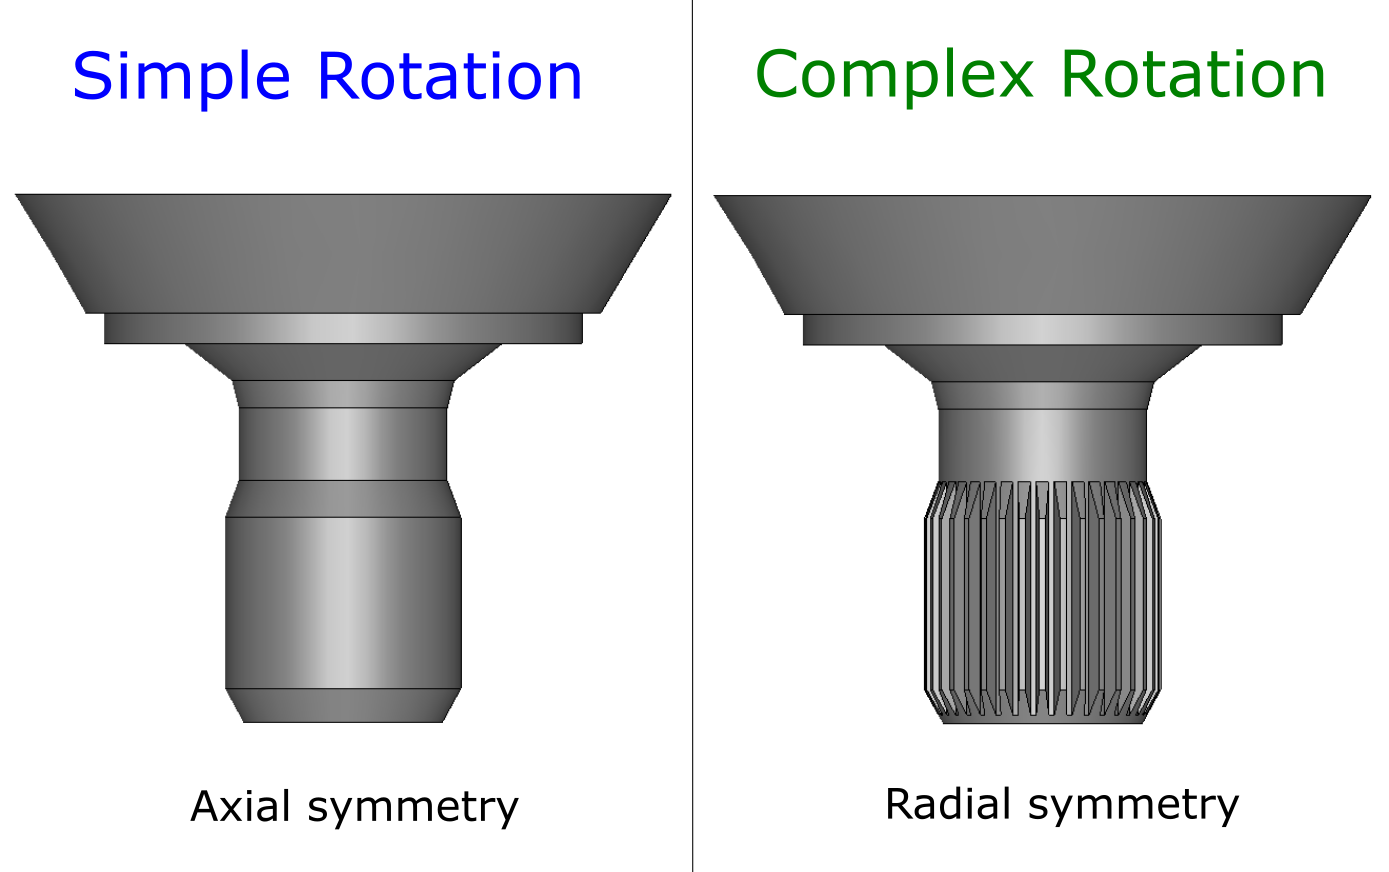
There are two ways to define rotation in CENOS - Simple Rotation and Complex Rotation.
To understand which approach you can use, you need to evaluate your workpiece. If the workpiece is axially symmetrical (you can revolve its crossection around rotation axis and create your part geometry), then you can use Simple Rotation.
If the part is not axially symmetrical (for example it has splines), then you cannot apply the Simple Rotation and you need to go with the Complex Rotation instead.
How to define Simple Rotation?
Simple Rotation is the easiest form of rotation definition in CENOS, and you can easily define it directly in CENOS.
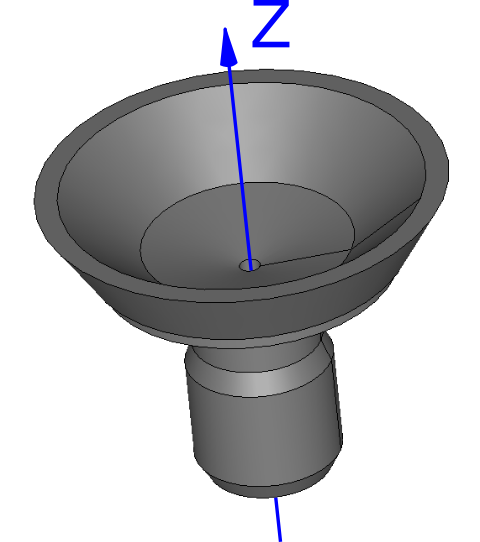
1) Set revolution around Z axis
Before you want to define Simple Rotation, make sure that your part is rotated around Z axis, as this is needed for CENOS to recognise the rotation.
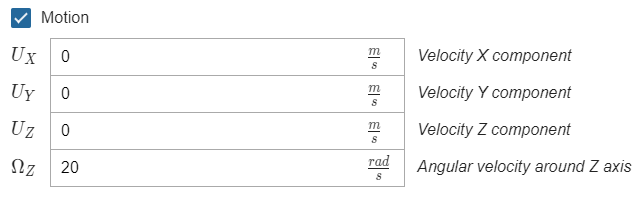
2) Enter rotation velocity
Once the geometry is positioned correctly and the case is set up, you can define the rotational velocity:
- Open workpiece Physics tab.

- Below THERMAL ANAlYSIS find and enable Motion check box.
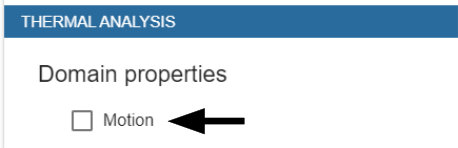
- Enter the rotational speed. Keep in mind that speed is entered in rad/s, so convert your velocity values if necessary!
How to define Complex Rotation?
Complex Rotation can be applied to every case and every geometry. It requires rotation definition through a parameter already in the geometry setup part, and can be used only with the Advanced Geometry Editor.
IMPORTANT: You need to define the Complex Rotation BEFORE you create a Partition. Once you have created the new rotational objects, use those to create a Partition, not the original imported geometries!
1) Prepare geometry
When you understand that you will need to use the Complex Rotation, you can prepare the geometry accordingly.
Make sure that you import every system part as a separate STEP file - one for workpiece, one for inductor, one for air etc. This will make it easier to add the rotational parameter to your geometry later on.
2) Create a parameter in Salome
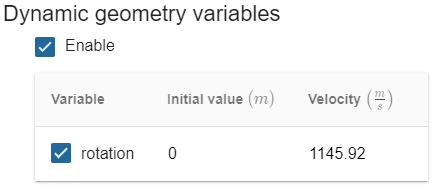
In Salome within Geometry module at the bottom of the Object Browser switch to NoteBook section and create a variable. In this example variable named rotation with initial value 0 is created.
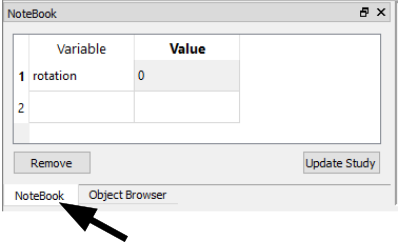
If you cannot find NoteBook, enable it in View → Windows → NoteBook.
3) Define the rotation of your system
Now you need to understand which parts of your geometry you want to rotate. CENOS does not allow to rotate a part for which heating is simulated, which means that we need to rotate the system and the air box around our workpiece.
This does not have an effect on the results as the relative speed between the part and the system is the same.
Select the Rotation funtion (Operations → Transformation → Rotation)
Select all objects you want to rotate (inductor, concentrators, air)
Define rotational axis (any axis or vector will do)
Enter previously created parameter as Angle.
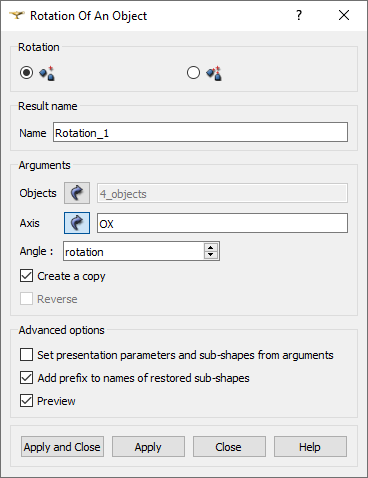
Once you click Apply, new Rotation objects will appear in the Object Browser. They are essentially the same geometry you imported, but with a rotation parameter attached - use these to create the Partition!
4) Enter rotational velocity
Once the Partition and mesh is done and exported to CENOS, you can define the rotational velocity of your system.
- In SIMULATION CONTROL enable Dynamic Geometry Variables.
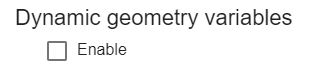
- Enable the rotation parameter and define the velocity. Note that velocity units for rotation in this approach is deg/s!